Translate

Thursday, April 30, 2020

Simple Shaker Card

Hello there! Welcome back!
I love shaker cards but I don't often enjoy making them because lining up all those layers of foam tape ends up being tedious. For day 8 Cathy Zielske shared a super cute and easy simple shaker card. We are nearing the end of the Spring Card Camp class so I decided to put one of these together. 

It involved using a small word die with chunky letters. I paired it with a sentiment from Friends Furever (MFT) and some colorful papers from Doodlebug. I feel sure this will brighten someone's day! 
Thanks for spending some time with me today. I appreciate it so much. 


Be yourself
     Delight in your craft 
        Make something beautiful!


Wednesday, April 29, 2020

It's Brand New!

Yes, the day is brand new and I'm here to share my second card from day 18 of Spring Card Camp. I combined the ink and masking technique to make the striped panel,  just like yesterday's card. This time I kept the design simple with clean layers and a bold sentiment. 


I'm loving this brand new paper I got from Waffle Flower Crafts. I don't often give shout outs to products but this one is so unique I just had to share.  It's a whole pad of 80 lb. card stock in sheets 5.5 x 8.5 so that you get two cards from one sheet. 

Softly neutral patterns but what is so cool is that they can be ink blended - as much or little as you want - to match your project. I ink blended for today's card and you can see how subtle it is. I thought you might like to see the card stock without the ink blending. What great possibilities! 

Are your days running together? Mine are too!  Don't know what day it is? That's OK, I am wishing you a beautiful day! 

Be yourself
     Delight in your craft 
        Make something beautiful!


Supplies used:
Stamps: Papertrey Ink - Huge Sentiments and dies
Paper: Neenah Solar White, Waffle Flower - Modern Neutrals, SU - Basic Gray
INK: DOX - Tattered Rose, Worn Lipstick, Seedless Preserves, Broken China
Accessories: Stitched Square and Rectangle dies


Tuesday, April 28, 2020

Masking and Inking

Hello everyone, how have you been doing? 
I've been involved with some other projects but today I made it into the craft room and got back into the Spring Card Camp. 

For day 18, we learned a terrific technique using masking and inking to create a striped panel. You can use the strips from masking to make a second card and that's what I have for you today. 


Inking was done with DOX in Tattered Rose, Worn Lipstick, Seedless Preserves and Broken China. I liked the color combo so I used them but had no idea how I was going to finish the rest of the card. 

The Beautiful Butterflies stamp set and die from Wplus9 seemed like a good idea. My favorite part of this card is the beautiful paper pack from Waffle Flower Crafts that I bought recently called Modern Neutrals. It's a pale gray and this pattern has the faintest design like bokeh to add interest without overpowering the focal point. 

I have quite a few days of class to catch up on, and will be back tomorrow to show the second card of this set. Have a wonderful night! 


Be yourself
     Delight in your craft 
        Make something beautiful

Wednesday, April 22, 2020

Rainbows and Sparkle!

Rainbows and sparkles make any day shine a little brighter, don't you think?  I do too! 
On day 11 of Spring Card Camp our teacher was Dawn Woleslagle who shared a lesson on creating a rainbow and cutting it to create two cards. The class gallery is chock full of rainbow cards so I know this was the fav lesson of many, including me! 


I have so many of the same supplies that Dawn used, so my card is an actual CASE of hers. I'm happy to share it here. It was fun and so easy to make that I can't wait to make more. I'm thinking these would be great for a note card set too. 

I appreciate your visit today, please take care! 


Be yourself
     Delight in your craft 
        Make something beautiful!


Supplies used:
Stamps:  Waffle Flower - Sweet Sentiments stamps
Paper: Neenah Solar White, WPlus9 - Fog
INK: Black, WPlus9  - Last Leaf, Wild Mango, Bloomsberry, Sweet Gelato
Accessories: Circle Dies, Cloud Die


A Two for One Inking


I'm back again with a second card using stencil techniques from day 9 at #OCCSpringCardCamp. Sometimes the card parts that don't turn out end up making the best cards! That's what happened with today's sample. 

Our technique involved inking a panel of card stock heavily over a stencil for card #1. Card #2 involved spritzing the inked stencil, flipping it over onto watercolor paper and smooshing. It turned out that I didn't care for the heavy inking version. But I loved what I got after the smooshing. 


I began with the Hypnotic stencil from Penny Black but it's almost impossible to make out the shapes on my card front.  

For now, I'm very happy with this soft look and simple design. The inks used were Tattered Rose, Abandoned Coral and Seedless Preserves. Hearts in die cut in white and vellum and a few sequins dress it up.
Thanks for taking a peek today!

Be yourself
     Delight in your craft 
        Make something beautiful!


Tuesday, April 21, 2020

Inking Stencils

I'm still keeping up with the Spring Card Camp from Online Card Classes. For day 9 we practiced some inking techniques with Channin Pelletier and I loved giving these a try. 

For today's card I used Distress Oxide Inks in  Antique Linen,  Peacock Feathers and Cracked Pistachio with the Square stencil (Simon Says Stamp.)


I cut and stacked four layers of the "Happy" die cut, and used a vellum piece behind the word to mute the colors and help the sentiment to stand out. I know that with every post I share how much I'm liking the class, but do you know what I'm enjoying the most?  Using some of my other sets that are NOT flowers!  The sentiments are from Written in Ribbons by The Greetery. 

I appreciate you spending time visiting me today. I hope that you are staying well and healthy and happy in spite of current difficulties.

Be yourself
     Delight in your craft 
        Make something beautiful!


Sunday, April 19, 2020

Day 6 Paper Piecing with a Twist

How are things going for you? I am glad you are able to visit today! As we begin a new week, I'm trying to get caught up in my crafting for the Online Card Classes Spring Card Camp. For day 6, Kristina taught us how to mass produce cards by paper piecing. 

Mass producing cards is something I almost NEVER like to do. But if it includes using patterned paper, I may give it a try. Before I knew it, I had made 14 cards! 


This is just a sampling of them. I really love having this colorful array of cards made. Later on, I may get around to sharing the rest with you, but for now I need to get caught up with the other days' projects. 

I'm very happily sending these to my beloved MIL to send out to family. I had sent a couple dozen cards already but she can really use these as they are all unisex and generic in nature. Most of the others say "hello" or "I'm thinking of you" on the front. I had to force myself to let the paper shine and keep the rest simple. As in easy (for me) and not fussy! 

Thanks so much for coming by today. I'm off to play. Sending hugs - 


Be yourself
     Delight in your craft 
        Make something beautiful!


Sentiments and dies are from The Greetery. 

Friday, April 17, 2020

Watercolor Background with Roses

Hello to you and happy Friday! 

I am popping in with another take on the technique shared on Day 5 of Spring Card Camp. The card I shared yesterday was supposed to be my practice piece. For whatever reason, I just had to do this again! You all know that I love to watercolor. 

Choosing my Altenew watercolors I combined yellow, greens and orange for my background, generously spattered with gold metallic paint. 


I found that the delicate die cut did't work best as a mask because some of the paint seeped underneath so it's mainly the outlines of the leaves that you see. Of course, I kept adding color and maybe should have stopped sooner. 


I adhered some of the die cut pieces to add interest, depth and to mimic the shapes of the roses. The eye should fill in the rest. Nuvo drops in green and gold were liberally placed as well. 

For the second card using the die cut, I have a much softer background and I like the more delicate look of this card. 


Cutting two roses from the bouquet die cut gave it a better fit on the card front. The sentiment was embossed in gold on a strip of vellum wrapped around the card. For shine and shimmer I added gold sequins. 

I'll list some supplies below for you. Keeping this short as it's a gorgeous day to be outside today. 

I hope that you are staying well where you are. I will probably be back tomorrow or even later today to share more class projects! All this blogging has been a great outlet and I am so thankful for your kind comments!

Be yourself
     Delight in your craft 
        Make something beautiful!


Supplies used:
Stamps:  PTI - Sentiment Staples: Sending You, and Inspired: Prayer and die
Paper: Fabriano Extra White Water Color 
INK: Versamark, Pear Pizzazz (SU)
Accessories: Memory Box - English Rose Bouquet Die (I can't find this anywhere online - could it be retired already?), embossing powder in white and gold


Thursday, April 16, 2020

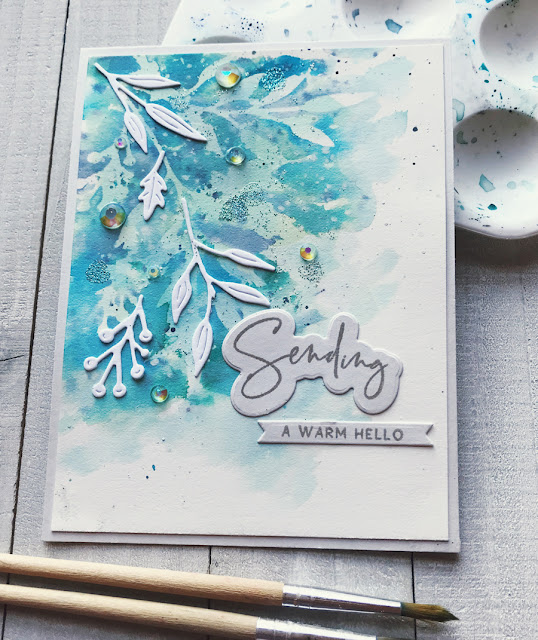
Day 5 Watercolor Backgrounds with a Stencil

I've loved Online Card Classes for a very long time! I'm especially enjoying Spring Card Camp since the stay-in mandates have left me with LOTS of time to stamp. And at least for week 1 I've been able to keep up. 

For day 5 we are focusing on watercolored backgrounds. You know I love these, so I went right to work! 

The twist is to use a die cut: first as a stencil and then as a die cut over the inking on the second card. 

I used Fabriano Extra White watercolor card stock, and Distress Inks painted on with a brush for the colors. 
For both cards I used the Inside and Out Berry Branch Die (The Greetery). 

For the first card the die cut was used as a stencil.  It was spattered with paint but when I removed it the leaves outline remained. I loved the way this turned out.


 I took the stencil and adhered it over the background on the second card.


For both cards, I added accents of the die cut leaves in white to add brightness and texture. The lovely sentiments and coordinating die cut are from the Cotton Comforts set (The Greetery.)


Needing some shimmer, I embossed circles with Wow Sea Glass Embossing Glitter and added clear jewels. Here is a closer look.


I have no idea what I'll be making tomorrow. First I've got to clean up the huge mess in the craft room. I'll be back. 

Thanks for visiting! 


Be yourself
     Delight in your craft 
        Make something beautiful!


Tuesday, April 14, 2020

Day 4 one more

When I made the clean and simple card for the previous post, I had one die cut ellie left over. The idea is to make two cards so here is one more for you! 


The simple sketch made it easy to color up the elephant add a die cut and some DSP and there's one more birthday card in my stash. 

You know I love flowers but it's been nice to find some of these other cute images and work out ways to use them on a card. 

I'm in lift off mode with my mojo, feel it coming in for a landing! 


Playing with the folks at CAS(E) This Sketch who inspired the layout. 

See you tomorrow!


Day 4 Clean and Simple

Nothing beats making a Clean and Simple card as inspired by Julie Ebersole. We got great tips and samples at today's Spring Card Camp class. I am so grateful for the timing of this class. I've really been in stay-at-home mode since January and I absolutely need something to help me be motivated. 

Here's my card for today, using the Unforgettable stamps and dies from WPlus9. I went looking through my stash for a line drawing so that I could color with my Polychromos pencils, and matching dies. These elephants have long been some of my favorite images. 


I kept the front very simple, with a strip of DSP and a die cut through to the inside of the card. I intentionally wanted to create the feeling that this guy was sort of just suspended there in space. That would be unforgettable! 

On the inside you get the rest of the picture and the sentiment. 


The key to a well-designed CAS card is having an image with enough details to make it interesting. I used Glossy Accents to add to the elephant and made sure it was a strong focal point for the card front.

The only other embellishments are a bit of shimmer and the twine bow. I am trying not to feel guilty about all this craft time, but grateful instead that I have this mental challenge to keep me engaged! 

But OH, I miss our children and grands. Seems like it's been SO LONG since we've had hugs. I've been doing lots of talking to myself lately. 

Thanks for your visit today, I sure appreciate you dropping by. 


Be yourself
     Delight in your craft 
        Make something beautiful!


Cut Paper Background Scenes

Hello there! For Spring Cards Stamp Day 3 I was busy creating all afternoon. We used an abstract background stamp to create scenes and it was quite a challenge for me. 

My background stamp (SU retired) has wild animal stripes on it. Stamped on different colors of paper, can you see the possibilities? I cut it out and pieced layers for each card. 

An ocean voyage?  For a birthday card or just, thinking of you.


Spacious skies, fields of grain and rolling hills? 


Well you have to use your imagination. 


What I liked about these cards is that they are very colorful. What I didn't like? They were time consuming. But I am reminding myself that learning something new takes time, especially the process part of wondering what to use and how to make it work with what I have. 

The sense of accomplishment is nice. Sharing is fun! The best part is getting two cards for one technique and it really does get my brain thinking about how to make the next one. I know it will get easier. I also know that I could have cheated and used a die to create the same look, or nicer actually. But I wonder, what's the fun in that?

Thank you so much for visiting and listening to me think out loud. You are so kind! 

Be yourself
     Delight in your craft 
        Make something beautiful!


Monday, April 13, 2020

Spring Card Camp Day 2

Hello, welcome back to my blog! Our Easter day was very quiet but we enjoyed special face time and calls with our loved ones. 

I've taken many Online Card Classes and loved them, so I was excited to sign up for the Spring Card Camp when Kristina and Jennifer announced it. I always love learning new techniques or just having the prompts to make cards that aren't in my usual wheelhouse. 


I enjoyed using the My Whole Life stamps from WPlus9 to stamp once and then make two panels with the cards.  After randomly stamping I stenciled soft yellow dots in one area to pull it all together. Using a sponge dauber, I blended a second layer of inks on some of the images. I kept them very simple and one layer. 

The class goes on all month, it's not to late to join in! A great value and they are geared towards using supplies that we already have. Just the kind of diversion I need now while stuck at home.

I'll be keeping these posts short so that I have more to time to stamp and keep up with posting. I'd be happy to answer questions if you have any in the comments about the supplies I used. Thanks so much! 

Be yourself
     Delight in your craft 
        Make something beautiful!


Friday, April 10, 2020

Budding Beauties Cherry Blossoms

Our flowers and trees are blooming so beautifully right now! Our redbuds and azaleas, and beautiful dogwoods have been so pretty this week.  

I went to clean up yesterday's supplies after posting THIS card and decided to make one more card with this fun stuff before putting it away! 

The Halfsies Diamond die always makes a clean and elegant card, enabling the focal point to shine. I kept that very simple, inking up one cherry blossom branch image, die cutting it and adding an olive green thread bow. 


Another special die cut, *new* to me, is the Brick Layer Die. I placed the die on the card front itself.  The Halfsies panels were inked with Distress Oxides and placed over the card front. Adding an inked panel inside the top of the card adds depth and hides any writing on the inside of the card. Hope that makes sense. 

I wanted the look of warm stucco for the card front, so I let my inking be a bit mottled. I really liked how that turned out, but it was difficult to photograph!

This is my second card made for the Freshly Made Sketches this week. This take on the sketch is much more CAS. 

Thank you so much for your visit and kind words. Take care and I pray that you will stay well.

Be yourself
     Delight in your craft 
        Make something beautiful!


Supplies used:
Stamps: The Greetery - Budding Beauties Spring Stamps, Sentiment Suite: Birthday Stamps and dies
Paper: Neenah Solar White, Pear Pizzazz
INK: Versamark, Altenew - Warm Mocha, Rouge, Crimson, Frayed Leaf: Distress Oxides - Antique Linen, Tea Dye, Aged Mahogany
Accessories: Altenew - Rose Gold Embossing Powder, The Greetery Dies: Halfsies, Brick Layer


Thursday, April 9, 2020

He Cares for You

I am back in the craft room today. Had time to putter around tidying up and then make this card. It began with pieces on my desk that I decided to work on before putting them away. Things went on from there and here you go! 

The tulips were stamped the day my recent Greetery order arrived and I decided to add some details with colored pencils.  Went looking for a sentiment, and found this one already stamped and embossed on vellum. As you can guess the die cut was also already prepared. 


You'd think I just put this together quickly, but I know you know how long picking paper and arranging everything can take. HA! I don't think it's just me, am I right?

Anyway, I'm glad you're here today to see my card so I'll surprise you with the next tidbit. I even finished the inside. 


I'm joining the challenge at Freshly Made Sketches today, although I'm hoping my card isn't too busy. 
That's it for me today, I hope that you are able to enjoy peace of mind in these trying circumstances. Thanks for coming! 

Be yourself
     Delight in your craft 
        Make something beautiful!


Supplies used:
Stamps: The Greetery - Budding Beauties Spring, Comforting Commands; and coordinating dies
Paper: Neenah Solar White; DSP is Lovely Day by Mintay Karola
INK: assorted inks from Altenew
Accessories: Cozy Cup Coaster Die and Sentiment Suite; Basics dies from The Greetery