Translate

Showing posts with label holiday. Show all posts

Tuesday, November 21, 2023

Mugs of Joy!

Are my American friends in the midst of Thanksgiving prep? My kitchen is filled with signs of delicious foods to come for the big feast. But I still found just a bit of time to stamp over the weekend. 

The Penny Black stamps called Mugs of Joy are darling images of whimsical mug figurines filled with greenery that I just could not resist. They've been newly added to my collection and I just loved using one of the images for today's card. 


The Paper Players are asking for CAS cards featuring TAGS and this was so fun to put together. 

The snowman mug was stamped in light gray and colored with watercolors and markers on the stripes of the scarf. I combined these blue papers from my stash and added a white die cut with The Greetery's Coaster die. 

I will share this also at NBUS. Thanks so much for your visit today, have a wonderful Thanksgiving! 

Be yourself

          Have delight in your craft 

               Make something beautiful!  


Sunday, January 2, 2022

The Paper Players! This is my year!

 Hello friends, 

Happy New Year!

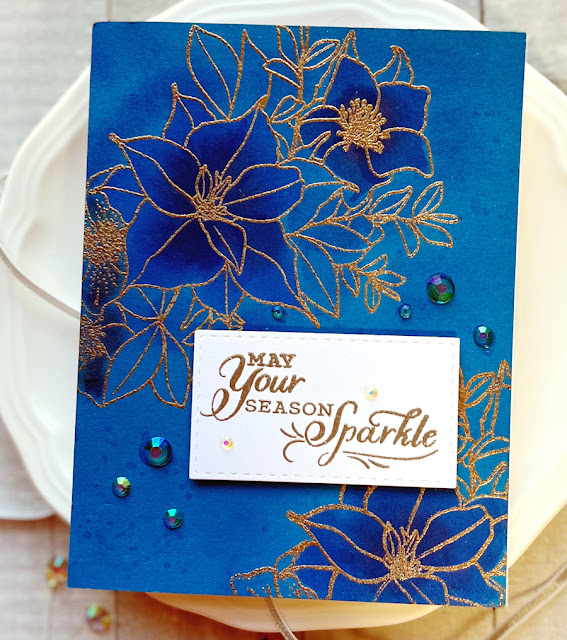
I am thrilled to be one of the guest designers at The Paper Players for 2022! It's long been one of my favorite card challenges and will mean another weekly post for me as I play along. They have a wonderful line up of talented stampers who are such delightful people! 

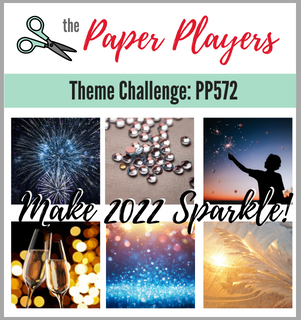
The theme this week from Ann, is Sparkle! 

I loved the bright blue night skies and bokeh lights and gold sparkle! 

I put them together in today's card. 


I began by stamping the Christmas Rose image (WPlus9) and embossed it in gold. Masking allowed me to sponge Distress and Oxide inks just into the large blossoms for added shading and depth. 

A bit of splatters and gem stones added to the sparkle. I just love the sentiment (SU - Snowflake Wishes). I really like combining metallics on a card! I embossed the sentiment in Platinum. 


Can't wait to see how your cards sparkle! 


Be yourself

          Have delight in your craft 

               Make something beautiful!  


Thursday, October 1, 2020

The Color Hues #3

 Welcome to the Color Hues Challenge #3! I've been loving the Color Hues Color Challenge and especially the inspiration I get from all of you! We are so grateful for the fabulous entries since we've begun, and your enthusiasm in playing along! For our third challenge, we'd like you to use Gold and Cream. You will be aware comparing my photos that this color combo is hard to photograph well. 


This photo shows the details best and the second one portrays the colors better. 

I had the Floral Fantasy set by Papertrey Ink in my mind as soon as I saw these colors. They speak elegant holiday to me, and I added the texture behind the buck using the Evergreen Embossing Folder from Stampin' Up! 


Gold embossing, gold mirror card stock and gold flat sequins dress it up. Remember taffeta ribbon? Thankfully I still have a bit. This did just call for a sweet bow. 


Can't wait to see what you make for this challenge! Check out the blog and be inspired by the team's sample too! I am so thankful for your visit to my blog today.

Be yourself

     Delight in your craft 

          Make something beautiful!


Thursday, December 20, 2018

Celebrate In Style

Hello everyone! 
I've been so caught up in Christmas preparations and events. Have really missed my crafting and regular posts. It's a busy time of year but I'm delighted to be able to stamp today as the featured guest stamper at CAS(E) this Sketch! I'm so honored to stamp again with this talented team of designers. 

I need a card to be on hand for a January guy birthday and I wanted to create a classy style. Choosing bold neutrals with gold gave me a great head start on a card that could also double as a New Year's greeting.


I'm way out of my comfort zone with two grays and black but they do look really good with lots of white and gold accents. 
Here's the sketch. 


You can find the challenge HERE and it will be in play for two weeks. Hope you will check out the wonderful projects and make your own to join in the fun! 
Thanks for your visit. Hope you have many good things to celebrate today.   

Be yourself
     Delight in your craft 
        Make something beautiful!


Supplies used:
Stamps: none
Paper: Neenah Solar White, SU - Basic Gray and Basic Black, WPlus9 - Fog, Gold Foil paper

Accessories: Sissix - Celebrate die, SU - Starblast Edgelit Die (retired) 


Tuesday, November 27, 2018

Yuletide Sparkle

Hello!
Time for another card using the Bold Borders: Yuletide Die with lots of sparkle and the bling of foil!
I'm loving making multiple inked borders and keeping them handy until the idea strikes to use it for a card. For this background, I inked the panel with Distressed Oxide inks and then covered that over with Versamark Ink, adding a layer of glitter for a super sparkly look. The photo only shows a smattering of this, but IRL it covers the entire panel. 


I also layered inks to add shading to the die cut greenery. I adhered silver foil to the die cut sentiment which makes it stand out with SHINE as the focal point. 

I'm playing along with the Love of Layers Make It Monday Challenge at PTI. Hope you have a great day! 


Be yourself
     Delight in your craft 
        Make something beautiful!


Saturday, October 20, 2018

Sweet Wishes with Merry Mug

Hello on this Saturday night! 
Although it's not when I usually post, it's not too late to join in with the Create Along with Us Challenge at PTI.  We've been inspired with so many fabulous holiday projects for the new release and I just couldn't resist getting out some goodies to play along. 

I just fell in love with this card by Betsy and especially her color combo of Aqua Mist, Hawaiian Shores, Berry Sorbet and Navy.


I was also itching to use my snowflakes stencil from the Fairytale Christmas Kit on a sponged background. 


I sponged using Distress Oxide inks adding Embossing paste with glitter over the stencil.

How about incorporating that snowflake pattern onto the cute striped cup from the Merry Mug set? I think it worked to pull to whole design together. 

Can you tell I had a blast making my card? And it will be so sweet for that special someone. As for the pink sequins, they are my favorite!
Hope you're having wonderful weekend, Thanks so much for coming by! 


Be yourself
     Delight in your craft 
        Make something beautiful!


Thursday, November 16, 2017

More Merry and Bright

Hey there! 
Hope you are doing well today. 
I realized that this is the only week I have to finish making Cards for Hospitalized Kids if I want them to arrive in time for Christmas. And I do! 
I can't get enough of the cute images from the Merry and Bright set from Simon Says! I created a scene using Distress Inks to make a background and masking the reindeer.
I spritzed the background with water and added die cut snowflakes and a little glitz from my Wink of Stella pen.


Once I had all the supplies out, it was easy to create a few of these using the Misti for stamping. 


I love coloring, but that was enough for me for one day. I only wish my photo did the colors justice. I have trouble photographing blends well, they are either too washed out or too deeply contrasted. 

That's enough rambling from me. Thanks to you for coming by to visit! 

Be yourself
     Delight in your craft 
        Make something beautiful!


I will be adding this to the Challenge at SSS called Furry Friends and Happy Little Stampers CAS Challenge Christmas.


Supplies used 
Stamps: Simon Says Stamp - Merry and Bright
Paper: white
Ink: Distress Inks - Worn Lipstick, Candied Apple, Cracked Pistachio
Accessories: Copic markers, Wink of Stella


Wednesday, November 15, 2017

Merry and Bright

It's been a busy week, the days have flown by! Gladly, I had a bit of time to stamp some cards for Christmas with the Merry & Bright stamps from Simon Says Stamp. 

This cute little deer will cheer someone's heart and bring a smile, I think. He was lots of fun to color with Copics, and I added a dab of Stickles to make his red nose. 


I made a few of these shaker cards to add to the growing pile. 


I stamped snowflakes on the Pool Party card stock backing the shaker and heat embossed them in white. I also embossed the sentiment.

I love shaker cards and I just have to play with them a little before they get mailed. 

We had a walk with Josie this afternoon and saw three deer just 40 feet away from us next to the street. They just watched us walk by. On our way back, the doe was nursing one of the two fawns. What a peaceful sight to see that cheered me on this pretty day.

Glad to have you visit today, and I hope you will come back soon.

Be yourself
     Delight in your craft 
        Make something beautiful!


Supplies used:
Stamps: Merry & Bright - Simon Says Stamp
Paper: SU - PoolParty, Cucumber Crush  DSP: Lawn Fawn - Perfectly Plaid Christmas
Accessories:  MFT - 2 inch circle shaker pouches, Lawnfawn - Mini Wreath dies (bow)

I'm linking to the following challenges
SSS - Wednesday Challenge Critters   Word Art Wednesday Anything Goes


Tuesday, October 17, 2017

Repeated Shapes for Christmas

Good morning! 
It's another card inspired by the Online Card Class Merry Making. I love a challenge and this class has given me some chances to try new ideas and make them my own. While doing it, my Christmas card stash is growing every day! 

I love that result. Todays' card uses a simple idea of repeating shapes in non-traditional Christmas colors.


 I "kissed" the stamp with ink to get the stripes and trees patterns and made it more festive with gold embossing and sequins in shades of pink.

I'm so glad you could join me today. 

Be yourself
     Delight in your craft 
        Make something beautiful!


Supplies used
Stamps:  Stampin' Up! Your Presents
Ink:  Veramark, SU - Cool Caribbean, Tempting Turquoise, WPLUS9 - Little Piggy, Cockleshell
Accessories:   Princess Gold embossing powder


Monday, October 16, 2017

Christmas Blessings

Hello there!

I'm posting another Christmas card today. This technique, presented by Jennifer McGuire at class, incorporates scoring into your stamped design.  I couldn't wait to try this one out. 

It's perfect for a bold, detailed image, and for creating a classic card that's flat for mailing. 

Several of my images were masked for this design. This would be a great choice for mass producing with my MISTI. 


Although tempted, I refrained from adding glitter, gold, or sparkles in any form. Just letting the clean design speak. I've listed my supplies below. 

Thanks for coming by to take a peek! 

Be yourself
     Delight in your craft 
        Make something beautiful!


Supplies used
Stamps: Papertrey Ink - Spruce & Sprigs, Christmas Cheer
Ink: PTI - New Leaf, Olive Twist, Pure Poppy, Autumn Rose 
Accessories: Score board


Friday, October 13, 2017

Dashing through the Snow Flurries

The last technique I'm trying from day one of the Online Card Class Merry Making was taught by Jennifer McGuire, who makes such beautiful cards! She taught us several ways to add the look of snow to our backgrounds and I tried using white embossing powder two different ways on my card to look like snow. 


My catchy title to this post may have misled you. I did not dash through snow or ANYTHING else while making this card. It took  a L-O-N-G time and a couple of attempts that ended up in the trash until I got a sample I could post. Still in the learning curve on this one but I will try it again.
I began with white card stock which I did double emboss. First in gold, then in green to add the holly leaves. For the berries, I used Nuvo Crystal Drops in Red Berry Gloss .  

I  sure am glad that the weekend is finally here and I will be having more time to stamp. I look forward to playing with the ideas from day 2 and onward! Happy stamping to you.

Be yourself
Delight in your craft 
Make something beautiful!

Double Embossed Background

Believe it or not, I'm still working from the ideas given on Day 1 of the Merry Making class! 
I am captivated by the techniques and I just have to give them at least one try so I'm back again to share with you.

For today's card, I used the double embossing technique. I embossed my white card panel in gold, and then embossed over it again using a background stamp. LOVE this vintage look for a classic holiday card. 


I embossed the sentiment in white on a die cut oval of vellum, and finished with the name Jesus die cut from gold foil card stock. A soft bow and a gold sequin complete the festive look. 

The sentiment and Jesus die are by Papertrey Ink 
The background stamp is by MFT. 

I appreciate your visit today!

Be yourself
Delight in your craft 
Make something beautiful!


Tuesday, October 10, 2017

More Holiday Backgrounds

It's been a long time since I made three cards in one day . The inspiration and teaching at the Online Card Class  called Merry Making has been wonderful and I'm loving every minute. If you've never signed up for these classes offered by Jennifer McGuire and Kristina Werner you will find them to be excellent resources and loads of fun. 

I'm continuing with another background as shown in Day 1. This one is supposed to use cover plates, but this time I made my own by die cutting a trio of snowflakes from white card stock over and over again. I combined three shades of blue card stock for a bright background. 


Since my background is quite busy and I didn't want to cover it up, I kept the focal point small and simple.


I hope you're enjoying this preview of my winter/holiday cards. 
Happy stamping to you!


Be yourself
Delight in your craft 
Make something beautiful!


Supplies used:  
Stamps:   Avery Elle - Let it Snow
Accessories: Dies - Elizabeth Craft Designs - Reindeer (snowflakes); Impression Obsession Birch Trees